Solar edge (metal inverter with screen) Advanced
You can configure Wi-Fi communication on your SolarEdge inverter using any of these methods:
- WPS (Wi-Fi Protected Setup) – a feature built into most modern broadband routers that lets devices pair without entering a password. If your router doesn’t support WPS, you’ll need to enter the network password.
- Configure the password using the LCD light button – connect to the Wi-Fi network generated by the inverter and set the password using the light button at the bottom of the inverter. This lets you change the password without removing the inverter cover, and is the method this article covers.
- Configure the password using the inverter’s internal buttons – connect to the Wi-Fi network generated by the inverter and set the password using the internal buttons. This method requires opening the inverter cover and is described in the SolarEdge Wi-Fi Installation Guide.
The inverter’s internal Wi-Fi module is not pre-configured. You can set the module’s router name and password from a laptop or smartphone with Wi-Fi. If the Wi-Fi settings have already been configured, revert them to default first, then set up a new connection. Once connected, you can use a standard web browser to configure the inverter to join your home or site network.
Reverting to default Wi-Fi settings
Use these steps only if the Wi-Fi settings have already been configured and you want to change them. If the module has never been set up, skip to Connecting to the inverter’s Wi-Fi module.
- Enter the inverter’s Setup mode: press and hold the LCD light button (at the bottom of the inverter) for 5–10 seconds. When you release it, the following menu appears:
Optimizer pairing
Language <eng>
Communication
Maintenance
Information
Exit
- Short-press (one second) to scroll to the next menu option; long-press (three seconds) to select an item.
- Select Communication → Wi-Fi Conf → Load Defaults:
Scan Networks
Set key
Load Defaults
- Continue with the steps below to establish a new Wi-Fi connection.
Connecting to the inverter’s Wi-Fi module
Use this procedure to connect to a Wi-Fi module that has not been configured, or that has been reverted to default settings.
-
Scan for networks on a mobile device or laptop. A network named xbee-<mac address> should appear in the list:
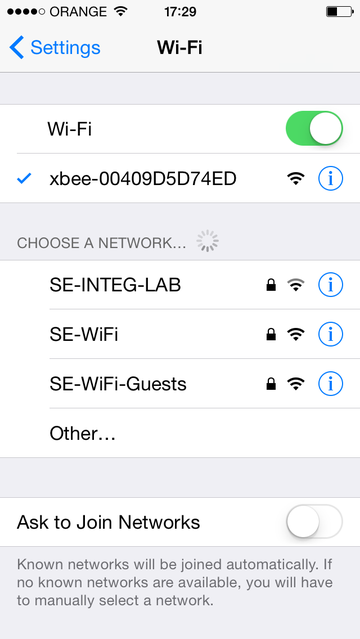
Figure 1: Wi-Fi network list - Select the xbee network.
-
Open a web browser and enter 192.168.1.10 in the address bar. The XBee Wi-Fi Provisioning Tool window is displayed:
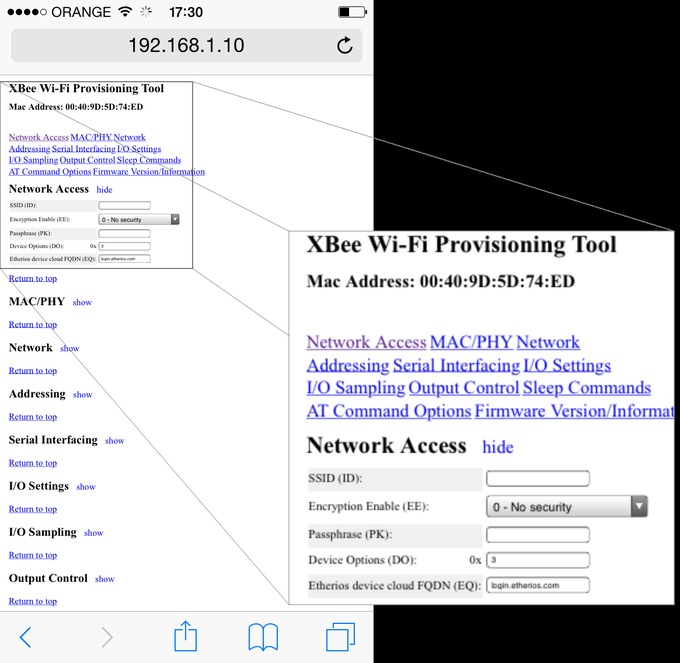
Figure 2: XBee Wi-Fi Provisioning Tool window -
Select Network Access.
Note: Do not change any Wi-Fi parameter on this page other than the ones specified below. - In the SSID field, type your Wi-Fi router name (the one that appears in the scan list).
- Select the encryption type, if applicable, from the Encryption Enable drop-down list. To find your encryption type, check the Wi-Fi settings on your device: connect to the router, select the connection name, and read the encryption type shown under “Security”.
- In the Passphrase field, enter your Wi-Fi router password.
- Click Apply to establish the connection with the router.
Your inverter is now configured to connect to your Wi-Fi network.